Scanning Color Negative Film
How to scan color negative film with a digital camera
Or an attempt at a method for scanning color negative film as mathematically and colorimetrically accurate as possible.
A few years ago, I set out to find the best way to scan and process images from negative film. After much testing and experimentation, I have come up with the method detailed in this post.
Motivation
Film scanning has often been confined to expensive hardware and proprietary “black box” software that leaves the user with little ability to control or replicate the result. There is also the risk of products becoming obsolete or unsupported. This method should be replicable using many raw processors and image editing tools including open-source software.
Digital cameras offer the possibility to get a high quality, accurate scan with complete control of the process from start to finish. Unfortunately, there is a lack of accurate information on the internet on how film captures colors and how to accurately translate these colors into a positive image.
Overview
- White Balance
Compensate for: backlight, film base color, and lighting of individual film frames. - Color Space Conversion
Convert color space from raw camera rgb. - Density Balance
Compensate for differences in measured dye density between the channels. - Invert
Invert colors by dividing.
How film records light
Color negative film reacts to light linearly. It is not logarithmic, nor does it have a contrasty S-shaped response curve. It records a flat and very low contrast image. It does not compress highlights or add contrast by crushing shadows. Slide film, movie print film, and photo print paper all produce a higher contrast image. A negative needs to be either printed onto photographic paper or a scan can be processed with a tone curve to get the desired contrast in the final image.

When developed, the more light that hit the film the darker it will be. The amount of light the film blocks is measured as density. Density is calculated as:
density = log10(1 / transmittance)
Transmittance is the amount of light measured by the camera or scanner with the film in front of a backlight.
0 means no light got through and 1 is fully transparent. If we plug numbers into our density function: .1 is a density of 1, .01 is 2, .001 is 3, etc.
Because density increases approximately linearly with log exposure as seen in the characteristic curves, we can say: log(1 / transmittance) = log(exposure). The logs cancel out and we get: exposure = 1 / transmittance. This is the relationship that must be used to correctly convert the negative to a positive.
The orange film base
For the purpose of scanning, the orange-ish base color of the film is a uniform tint that can be canceled out by simply white balancing. The base color of an unexposed negative does not represent black, it is only the darkest value the film can record. It is also not necessarily neutral gray and may have a color tint.
Because the orange tint can cause under exposure to the camera’s blue channel, depending on the dynamic range of your camera it may be necessary to compensate with a blue lens filter.
Limitations of Digital Scanning
The only true, ‘ground truth’ way to produce a positive image from a negative is to print it onto photo-chemical paper in a darkroom. Every other method is an subjective interpretation. Choices made when scanning will all affect how the negative is interpreted. Every different camera sensor + backlight + camera calibration + color space combination will have its own unique characteristics.
I believe that the scanning process can define the look of an image as much if not more than the choice of film. I think that many “film looks” are more a product of film labs or poor quality scans than any color science engineered by Kodak or Fuji.
With that said, it is possible to process a scan in a way that represents what was captured with a minimal amount of bias.
The process presented here aims to be as unbiased, accurate, and simple as possible. It relies on just a few adjustable parameters without the need to tinker with scanner software settings or manually edit rgb curves. And it will preserve the maximum amount of information in the negative for further editing.
A negative is similar to a digital raw image in that it records a wide range of information that needs to be transformed before it can be viewed, but unlike digital, where our goal is to translate the colors to how our eyes would see the scene being photographed, with scanning we want to preserve the colors as the film recorded them and not cancel out the effect of the film.
This post will focus on white light film scanning, where we are trying to capture the color of the negative dyes more or less how our eyes see them. It has been suggested that scanning with narrowband red, green, and blue LEDs would give a more accurate measure of the film’s densities. This makes sense in theory, but I have yet to see a demonstration that shows the improvement or differences with that method. All the same steps presented here would still apply to rgb scanning.
Software like adobe camera raw and Photoshop do not come with tools that make it easy to process negative scans. We must make our own camera profiles and luts, use different color profiles, and edit in linear gamma.
Getting the best possible scan can require some experimentation. I hope that the details explained in this post will help you find the combination of tools and settings that work for you and your camera.
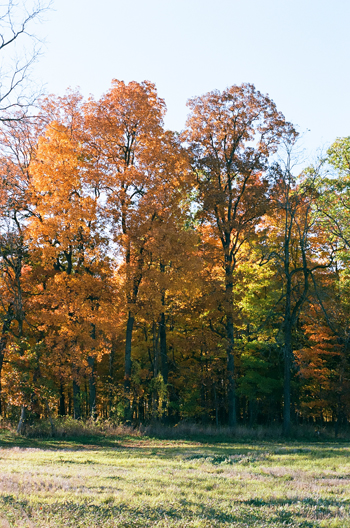
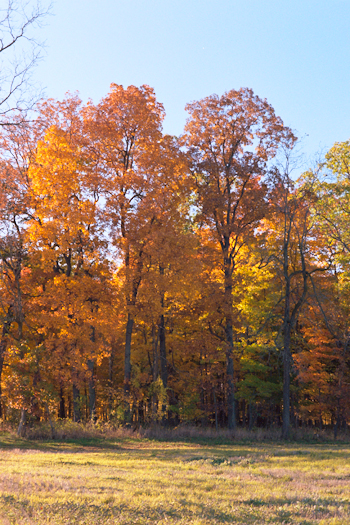
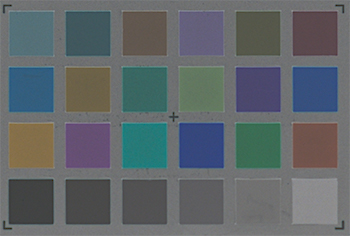
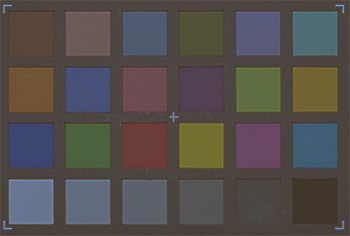
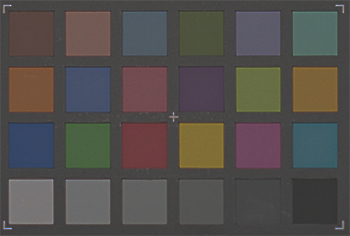
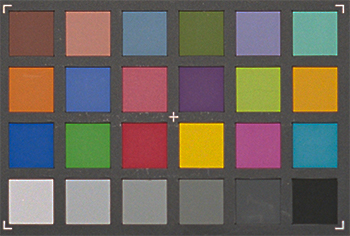
Comparison of scans of Kodak Ektar film
Hardware for Scanning Film
A brief list of hardware considerations for scanning film with a digital camera
- macro lens or other closeup
- use low iso, sharp aperture, shutter not too long
- shoot raw (obviously)
- film holder: flat, parallel, rigid, in focus
- handle film carefully
- backlight: evenly lit, smooth, broad spectrum, block out light contamination
- can use: flash, rgb, blue filter (like 80b or similar)
- expose as bright as possible without clipping the film base
- clean film, clean lens, clean sensor
- consistency
- film in same position for each frame
- same exposure
- consistent distance to backlight, lens, etc
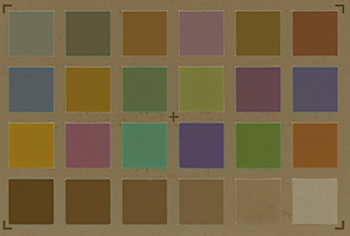
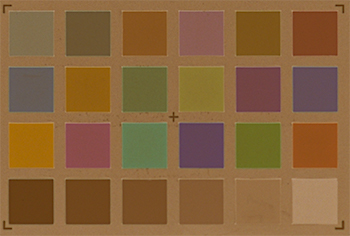
- shoot a color checker or stepped grayscale card on film for each film stock you use
Luts
Luts or look-up-tables can be very useful for applying a function to all the values in an image that cannot be done with built-in tools. 1d luts in the .cube format can be easily generated with a script. I have provided pre-made luts on github.
The lut functions are:
- inverse: 0.01 / x
- transmittance to density: log10(1 / x)
- density to luminance: (10^x) * 0.01
- inverse density: 1 / 10^x
(Some functions require DOMAIN_MAX to be set to a value greater than 1)
Paper Print Lut
I have also made a lut to simulate the response curve of photographic paper. The luts and info on how to use them are on the github.
The Process
The raw negative to positive image process has four main steps:
The order shown above is the most practical to use with most raw converters. Alternate orders of operation are possible and will be covered later.
The entire process assumes linear processing of the raw image, 16-bit precision, a linear gamma color space (or 32-bit mode in photoshop), and values in a 0 - 1 range.
White Balance
In digital photography, white balance is done by scaling the raw camera red, green, and blue channels separately to compensate for lighting and sensor sensitivity. For negatives, we will use white balance to adjust for the backlight color, orange film base color, and lighting the film was exposed in. White balance is analogous to adjusting color filters in an enlarger when printing to color paper.
The values can vary from frame to frame. The white balance value will vary depending on exposure. The specific exposure of the scan does not matter but consistency is important.
White balance can be done in a few ways:
- Done entirely in raw by setting to a value that results in neutral grays after density balance.
- Split into two stages: raw white balance to the film base, and secondary white balance as part of the density balance and invert stage.
- Raw white balance set to a constant value (other than film base) and fine tuning done after.
The split method is easier and a good place to start before finding what looks best for your camera and film. Because secondary white balance is applied in a different color space, it will have a slightly different effect than raw white balance. Raw white balance may look better. The white balance setting, in particular color temperature, will have a much larger effect on the colors if you are using a dual-illuminant camera profile.
Adobe provides dual-illuminant profiles for most cameras. These have different calibrations for warm tungsten light sources and cooler daylight sources. The two are weighted according to the color temperature setting. The calibration used is not necessarily the most accurate for the film. The orange film base may push the temperature closer to the tungsten illuminant while the daylight one or somewhere in between the two would be more accurate. You may want to make a D65 single-illuminant profile to avoid the dual calibrations shifting colors.
CameraRGB to Working RGB
This is the step performed by the raw converter where raw rgb values from the camera are translated into a more useful and standardized color space. This step typically happens after white balance and before other adjustments.
The information needed to convert from camera rgb is stored in a camera profile. A profile contains the color matrix and lookup tables used by the raw converter. These are calibrated to match camera rgb colors to real world colors.
To process a raw scan you will need a linear camera profile. See my other post Making Linear Camera Profiles with dcpTool on how to make a linear profile for your camera. When converted with a linear profile, and processed in a linear color space, the pixel values will be proportional to transmittance.
I have gotten good results with adobe standard (linear), but if you are unsatisfied with the color accuracy of your scans, there are a few things you can try.
- Changing the raw white balance
- A single-illuminant profile
- A matrix-only profile
- Adjusting the primaries in the calibration panel
Re-calibrating your camera is an option, but making a good profile can be tricky, and shouldn’t be necessary unless the current profile is inaccurate or low quality.
Matrix-only profiles should be sufficiently accurate for film scanning, and I have found that a matrix-only, single-illuminant profile produces the most consistent results.
Density Balance
A digital camera does not see the cyan, magenta, and yellow dyes of the film as equal in density. This causes a color shift in denser parts of the scan. To compensate, we need to scale the density of each channel separately. This allows us to equal out the densities so that gray stays neutral throughout the exposure range of the film.
This is the key step needed to get correct colors from a scan. I decided to call this step “density balance”. Density balance and white balance work together to define neutral gray. Changes to density balance must be offset by changing the white balance.
Density balance works by multiplying the density of each channel by a different value. This changes the contrast, or slope of the film’s characteristic curve. Alternatively, this is mathematically the same as raising each (linear) channel value to a power.
Functions:
density(x) = log(1/x)
inverse_density(x) = 1 / 10^x

inverse_density(density(x) * db) = x^db

density(x) * db = density(x^db)
A gamma adjustment in Photoshop is a power function. Note that the values are inversed so x^p is a gamma of (1/p). The middle slider in levels works as a power function only in 32-bit mode.
Converting to density can be done with a 1d lut or look-up table.
A density balance setting consists of three numbers (one for each channel) where 1.0 is the default or neutral value. One channel remains at 1.0 while the other two are adjusted to find neutral gray. The values can be determined manually, or automatically by using a frame of a color checker.
Manual
The values must be carefully chosen to find a best fit that works for a variety of images. The specific values used will depend on all the details of your scanning process, but with everything kept consistent the values can be used for all frames scanned from a particular film stock. Some frames can be adjusted differently from the best fit depending on personal preference or lighting conditions.
To adjust manually, leave red at 1.0 and reduce the green and blue channels. The blue channel adjusts blue/yellow contrast, and the green adjusts green/magenta. If highlights are too blue and shadows too yellow, the blue contrast is too high and needs to be set lower. The process is similar for the other channel. Repeat on both channels while also adjusting white balance until shadows, midtones, and highlights are all neutral.
A hue/saturation adjustment layer can be used to increase saturation to aid with density balance.
Automatic
The values can be calculated automatically from two gray patches on a color checker. I highly recommend shooting a color checker on film at least once for all the films you use. A scan of a color checker can be used to calculate density balance and verify a scanning system isn’t producing any bad color shifts.
I have provided a python script for calculating white balance and density balance. This can also be automated in Photoshop using a javascript. This script will create adjustment layers for density balance from sampled negative colors. Details on using the script in Photoshop are covered in the automation section below. The script will keep green at 1.0 and increase red and decrease blue.
Invert
As discussed above, we will invert the colors by dividing:
positive_value = 1 / negative_value

or:
positive_value = 10 ^ density
In practice the result must be scaled by some value, typically 0.01, otherwise all the values will be above 1.0:
positive_value = 0.01 / negative_value
The color space used when inverting has a huge effect on the resulting inverted colors, so choosing the right working space is critical to getting a good result. The most common color space for raw editing, ProPhotoRGB, is among the worst, producing ugly color shifts. Other offenders include Adobe WideGamut and small color spaces like sRGB. A large gamut color space that inverts film negative colors to plausible positive colors is needed, it also needs to perform well for density balance and white balance.
Among the common color spaces I have tested ACEScg is probably the best, and rec2020 is similar. If you want to use ACEScg I recommend ACEScg-elle-V4-g10 from elles_icc_profiles. The main issue with many color profiles is a shifted hue of yellow (blue negative). I have experimented with creating a new rgb profile with a blue primary at a position that inverts blue to yellow, but I will not cover that in this post.
Practical Guide
This section focuses on Adobe Photoshop, but it can also apply to other tools including open-source software.
Step by step guide for Photoshop using adjustment layers
- You will need to use a linear gamma profile in 16 bit mode or use 32 bit mode.
In Photoshop we need to:
- white balance by multiplying each channel
- density balance by adjusting “gamma” of each channel
- invert with lut
- levels, curves, lut, camera raw filter, etc. for final contrast adjustment
There are several tools that can be used to implement the process in Photoshop, including:
Color Lookupadjustment layer using a lut to invert or convert to densityExposurelayers with theLayer Styleset to only affect 1 channelSolid Colorlayer onmultiplyblending modeSolid Colorlayer onaddorsubtractblending modeLevels(input/output white point) for white balanceLevels(middle slider or “gamma”) (levels can be used for density balance only in 32-bit mode)- It is possible to invert with the negative layer on divide above a solid color layer.
Open raw image in raw converter:
- set camera profile
- set white balance
- (optional): noise, sharpening, lens corrections
- all other settings at 0
- set output profile, 16bit
- open in photoshop
linear 16-bit process:
This method can be applied automatically by using a color checker to calculate density balance.
(this method may not work correctly in recent versions of photoshop, use 32 bit mode instead)
- add exposure layer with layer style set to affect only the blue channel
- add exposure layer with layer style set to affect only the green channel
- add lut adjustment layer with inverse cube lut
- adjust exposure layers
- use gamma for density balance
- use exposure for white balance
32-bit process:
- add levels layer
- add lut adjustment layer with inverse cube lut
- adjust levels layer
- use middle slider for density balance
- use input/output white point for white balance
Density process
The density process uses two separate luts. The first converts transmittance to density and the second lut converts density to linear luminance. It requires 32-bit mode to handle values greater than 1 and less than 0.
Because density uses a logarithm, it changes our math from a power function: (x * w)^d, to a linear one: (x + w) * d, which I think is easier to conceptualize than a curved function.
- transmittance to density:
density.cube - density to luminance:
10^x.01_4.cube
basic 32-bit density process:
- (optional) solid color layer on multiply for white balance (default white)
- add density lut adjustment layer
- add solid color layer on add (default black)
- add solid color layer on multiply (default white)
- add density to luminance lut
- adjust color layers
- adjust add layer for white balance
- adjust multiply layer for density balance
32-bit density process (best for manual adjustment):
This method uses extra adjustments to offset a neutral color to 0 to keep that color neutral when changing density balance.
- add density lut adjustment layer
- use the eyedropper tool to sample density of middle gray area of the photo
- add solid color layer on subtract using sampled color
- add solid color layer on multiply. default to white (1, 1, 1)
- (optional) exposure adjustment to compensate for overall reduction in density
- add solid color layer on add. set to a shade of gray similar in lightness to 1st subtract layer
- add lut adjustment layer. use density to luminance lut
- adjust multiply layer color for density balance
- the subtract and add layers will keep the sampled color neutral while changing the color of highlights and shadows
- to change white balance, adjust the subtract layer color
After the values for density balance are determined they can be used with any of the other methods.
All the above methods can use adjustments at the top of the stack to set exposure, contrast, curves, etc. A hue/saturation adjustment layer can be used to increase saturation to aid with density balance.
Automation
The creation of the layers can be automated with an action, and, if using a color checker density balance can be calculated and automated by a script.
Density balance script
To use the script:
- Use the eye dropper tool with sample size set to an average
- Set the foreground color to the darker gray patch, lower density (light) negative
- Set the background color to the lighter gray patch, higher density (dark) negative
- (to set up) Start recording a new action
- Run
density balance.jsscript with: File > Scripts > Browse - Create a
Color Lookupadjustment layer withinverse_01.cube - Stop action
3d Lut
The process can be baked into a 3d lut that can be used directly in acr/lightroom.
The lut would:
- convert prophoto rgb to another space (acescg)
- apply density balance and invert
- apply a tone curve (optional)
- convert colors back to prophoto
Such a lut would be limited in what it can do, but very useful for quickly getting a finished image or flat positive for editing. The only adjustments that can be used are Exposure and White Balance. Changing any other setting would disrupt the linearity of the negative.
The python script and instructions for making a negative to positive 3d lut are on github.
Order of Operations
The order of white balance, density balance, and invert does not change the result as long as they are done in the same color space. The values used for white balance will be different, however.
It is possible to do density balance or density balance and invert in camera rgb before converting to the working rgb colorspace, the result will be different for either processing order.
Last Updated 6-26-24
This post may be subject to updates, additions, and clarifications. Questions or issues can be raised in the issues section of this repository.